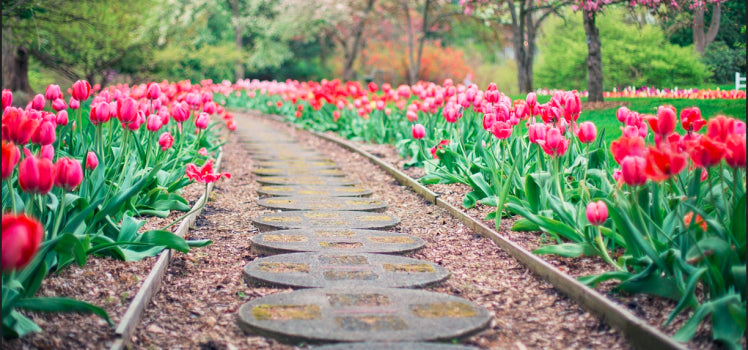
Create one garden catwalk It is an excellent way to embellish any outdoor space, be it small or large. When you choose the materials for your way, take into consideration a raw stone that offers a rustic and informal appearance. In addition, it should be complementary to the design of your home and garden. With this project you can create a special place to walk in your garden and enjoy the open air!
When you choose the stone for a vialetto or for any other type of construction, take into account the climate of your area. If winters are rigid, opt for dense stones such as granite, blue stone and quartzite that can resist the icy temperatures. For the hottest regions, the most porous stones, such as limestone and sandstone, are the most suitable, since they could break if exposed to extremely low temperatures.
Use the stone that most adapts to the design of your home, discover the most interesting from Hyperbric. If you have a modern house, opt for stones with straight edges or geometric shapes; If your home has a classic or vintage appearance, the bricks and the cut blocks (known as the Councils) are perfect; And for a country -style residence, raw and irregular stones will give it a rustic charm.
A walkway in the garden which branches out from a main gate and winds around the side of a house can give a rustic atmosphere to any outdoor space. This project is characterized by stone slabs for the route, with pebbles that form the edge. The wide wreck escapes between the stones merge with the surrounding meadows and plants, making it an ideal choice for the secondary paths that cross courtyards or gardens where traffic is not intense. For high traffic areas that lead to the entrance of a house, however, it is preferable to use close joints among the stones cut uniformly to facilitate walking and avoid stumbling.
Let's start the construction: phase 1
For this project of catwalk, we got the sandstone stone from a local dealer of construction material. It was packed on wooden pallets and sold by weight. Generally, a pallet produces about 1.5 tons of stone, sufficient to cover 80-100 square meters of route depending on the thickness. In addition, 25 4 -inch cobblestones were used to delimit the part that crosses a flowerbed.
Calculate the area of yours walkway in the garden to estimate the amount of material necessary. Begins by calculating the approximate width, then multiply this number by the length of the walkway in the garden to obtain total size.
The border stone is an excellent option for walkways and is available in various thicknesses, from one to four inches.
It is recommended to pave directly on well -drained soil; However, if drainage is a problem or if the stones are particularly heavy, it may be useful to lay them on a layer of gravel or sand.
Ghiaia is an excellent choice for areas subject to frost and frost, as its space allows the ice to expand without risking moving the individual stones. To ensure correct installation, many stone slabs are placed on a layer of stone - crushed limestone gravel sold to the cube meter. Usually it is recommended to buy 10% more to avoid additional delivery costs if you need other material.
Second step: the joints
Start positioning the stone slabs on the lawn and observes the distance between them. Make sure that the escapes, or the spaces between one slab and another, are consistent so that they are not 10 cm wider. Place the pieces to create a natural -looking path, with a balanced mix of colors and shapes. Have fun experiencing different models!
As a general guide, put two smaller stones next to each slab. Try the path walking above: if they are too distant or close, it changes the arrangement accordingly. Finally, be sure to fix and shape the stones to get a safer path.
We move on to phase 3
After drawing the route of the walkway in the garden, use a trowel or a spade to cut the earth around each stone. Once finished, remove the turf and put it aside for a second moment. Dig the ground for at least five centimeters to create an adequate base for the stones of the flooring. If you use thick stones, they can be placed directly on the ground without the need for a underlying layer of gravel. Create holes in the soil of the same shape and size of the slabs you intend to place. For the thinner pieces, the addition of a layer of gravel deep from one to three centimeters will create stability and make sure that everything remains in place. Finally, if necessary, add a layer of gravel to increase support and durability.
Phase 4: the stones must be level and compact
For a success of the installation of the walkway in the garden, regulates the gravel base under each stone to adapt it to its thickness. Use a rubber hammer to beat and level the stones with the soda of the surrounding earth until they are flush. Use a level to make sure that each stone is in uniform height and that none is too high. To ensure stability, swing back and forth on each of them with all your weight. If someone wishes, regulates the gravel as necessary. Repeat this procedure until the path of the stones of the walkway in the garden.
Final stages
It digs a shallow trench, about 15 cm in width and depth, on both sides of the route. Mix the premisite mortar containing cement and sand following the manufacturer's instructions. Prepare only an amount that remain usable for half an hour. Distribute a layer of three inches of mixture in the trenches and you sunny over the 4 -inch pebbles.
Place the pebbles in such a way that their top exceeds one or two centimeters the walkway. Use a rubber hammer to make sure they place themselves in the mortar. Hold the levels and adjust if necessary to keep everything coherent. To strengthen its stability, use a trowel with a slight angle to apply a little mortar along the external sides of the stones under the surface of the path. Listing it to give the final touch.


